Monday, May 31, 2010

Deal of the Year & Patio Table Update

We were at Lowe's over the weekend picking up a few things for the house, when I saw this chandelier setting on one of the clearance tables. It was marked down from $159 to 50% off, then marked to $25.00 and lastly to $5.00! At first glance it looked terrible, it had these little lampshades on each bulb adorned with a bright green ribbon and fake roses. They looked entirely out of place. It also had a nice layer of dust on it from hanging in the store as a display model. Upon closer inspection, it was easy to see that the shades were just clipped onto the light bulbs and could be taken off in 2 seconds. After removing them, it turns out its actually a nice looking chandelier that we couldn't pass up for $5.00! The funny part is now the shades we hated so much are hanging on a chandelier in my mom's house! They actually look completely different when they MATCH the light fixture!


The holiday weekend turned out to be incredibly hot and sunny. Nice weather, but standing in full sun working on the patio table turned out to be not as much fun as I had hoped. I wasn't quite able to get it finished, but I'm not too far off now. In this pic, the outside border is complete and I'm working on my layout for the slate pieces to fill in the rest of the field.


Getting some of the cuts made and piecing it all together. The little white "X"'s are plastic spacers to help me keep all my joints at 1/4" wide.


While I was working on the table, the kids were working on their "sculptures", they would barter over who got which scrap piece. On the top is Miles, Zander's is below.

I hope everyone had a good Memorial Weekend!

Monday, May 24, 2010

Patio Table

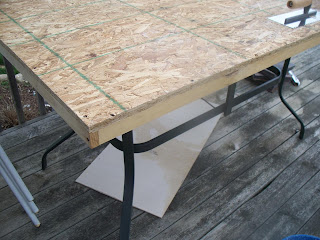
Here is yet another project I started. Fixing the patio table, actually more like rebuilding. What happened was last fall we bought a new glass top table. A couple weeks later after a really windy night, we awoke to see the deck covered in shattered glass. I had a pic of it, but can't find it now. So anyway, instead of buying a new table, I decided to just build a new top for it. I started with a sheet of 3/4" thick OSB cut to size, then added some 1"x2" edge boards.


Here's where I left off tonight, the table is covered in backer board, and I started cutting the tile and laying it out. The tan is a travertine marble, and the green is just a porcelain tile that matches the chairs. Tomorrow (maybe) I will start cutting the tile that goes around the star to cover the rest of the table, it is a darker brown slate.

Insteon Lighting Network

There's not really a whole lot I can show with pictures for this one, but its pretty cool so I thought it was worth mentioning. I set up all the lighting in the house to be on a network, as in you can turn on and off lighting from multiple places or even with the computer or an iphone (if I had one). Basically each switch is a little computer, it gives and recieves wireless and wired signals "talking" between each other. Now, from say the dining room, I can see what lights are on, and turn them on and off. From the kitchen lights to the upstairs hallway lights, they are all linked together. Likewise, from the master bedroom, I can see what lights are on downstairs, and turn them on or off.


The way I set it up was I worked from the back of the house forward, the kitchen is A, dining room B, etc.


Each button is backlit with an LED light. So in this switch here, the light is ON in the dining room, and also you can see how the A is lit up, meaning the kitchen light is on. Each light also is dimmable by holding the button down. With the computer software you can set lights to come on and off at specific times as well as set the rate at which it turns on or off. If in the morning you want the lights to slowly come on you could use it like an alarm clock. The bedroom light would slowly get brighter over say, a 5 minute time period.

Sunday, May 16, 2010

Barrels of Fun!

We wanted to install some rainbarrels for a few reasons, to have a water source closer to the garden and another was of course, to conserve water. Even though we are on a private well, it is still nice to have a surplus of free water and not run the well pump to water the plants. As far as being closer to the garden, I put the rainbarrels on the back side of the shed. So the first step was to install gutters and downspouts on the shed. I had found some old plastic barrels on Craigslist for a good price, the barrels used to contain Mountain Dew and Pepsi syrup. You could definately smell it when you opened the caps.

The next step was drilling holes to connect the barrels together. After drilling the hole I heated up the plastic with a torch to soften it up some so it would conform to the threads on the brass coupler. I also put a bead of silicone around it just in case.


Next I connected a piece of scrap garden hose that was scavenged from a trash pile someone had set out to the road. I just used a standard stainless steel band clamp.


Here is 2 of the barrels connected together. You can also see the elevated platform I built to keep the barrels nice and level and up off the ground a little higher so the water would flow better. I set the whole thing up on cement blocks. It had to be heavy duty because when full, each barrel will weigh over 450lbs.


All three barrels in place. I had bought four, but it turned out that one had a crack in it, so if I pick up another one, there is enough room for it if I slide the middle one over. I still need to connect in the gutters from the other side of the shed, so there will be another downspout coming in on the right side of the pic. If you look closely you can see the outlet on the bottom left barrel. It is a standard hose connection. The last step was to put a piece of screen over the inlet opening on the barrel so it doesn't turn into a mosquito breeding haven.


Before I built the platform I had let one of the barrels fill up with rain as a test . I had to drain it, so I drilled a hole for the connector. You can see the water has a decent amount of pressure with the barrel full.

Saturday, May 15, 2010

Master Bathroom Shelf

Well, I'm back to working on the bathroom again! In the master bath there was some dead space beneath the stairs up to the attic so I decided to put a shelf in above where the tub will be. It will be a good place to store towels, etc. Zander thought it was a fun place to play in.


With the arched top I had to put in a bunch of extra framing so when I drywall around the curve I will have plenty of places to screw into.


The curved opening mimics the arch of the dome in the bathroom ceiling.

statistics history
Dell Computers